A stamped concrete patio gives you custom texture and color that mimic stone or wood, while a smooth slab offers a clean, modern look and easier upkeep. The better choice in Cedar Park usually comes down to traction in wet areas, maintenance tolerance, and how heat and sun affect comfort and color. For wet patios, many contractors target about a 0.6 slip-resistance rating, per common safety practice, using texture or additives.
If you’re weighing style against day‑to‑day use in Austin’s heat and storm bursts, this post will help you judge traction, maintenance, weather wear, scheduling, and what to ask for in a bid so you can compare quotes confidently.
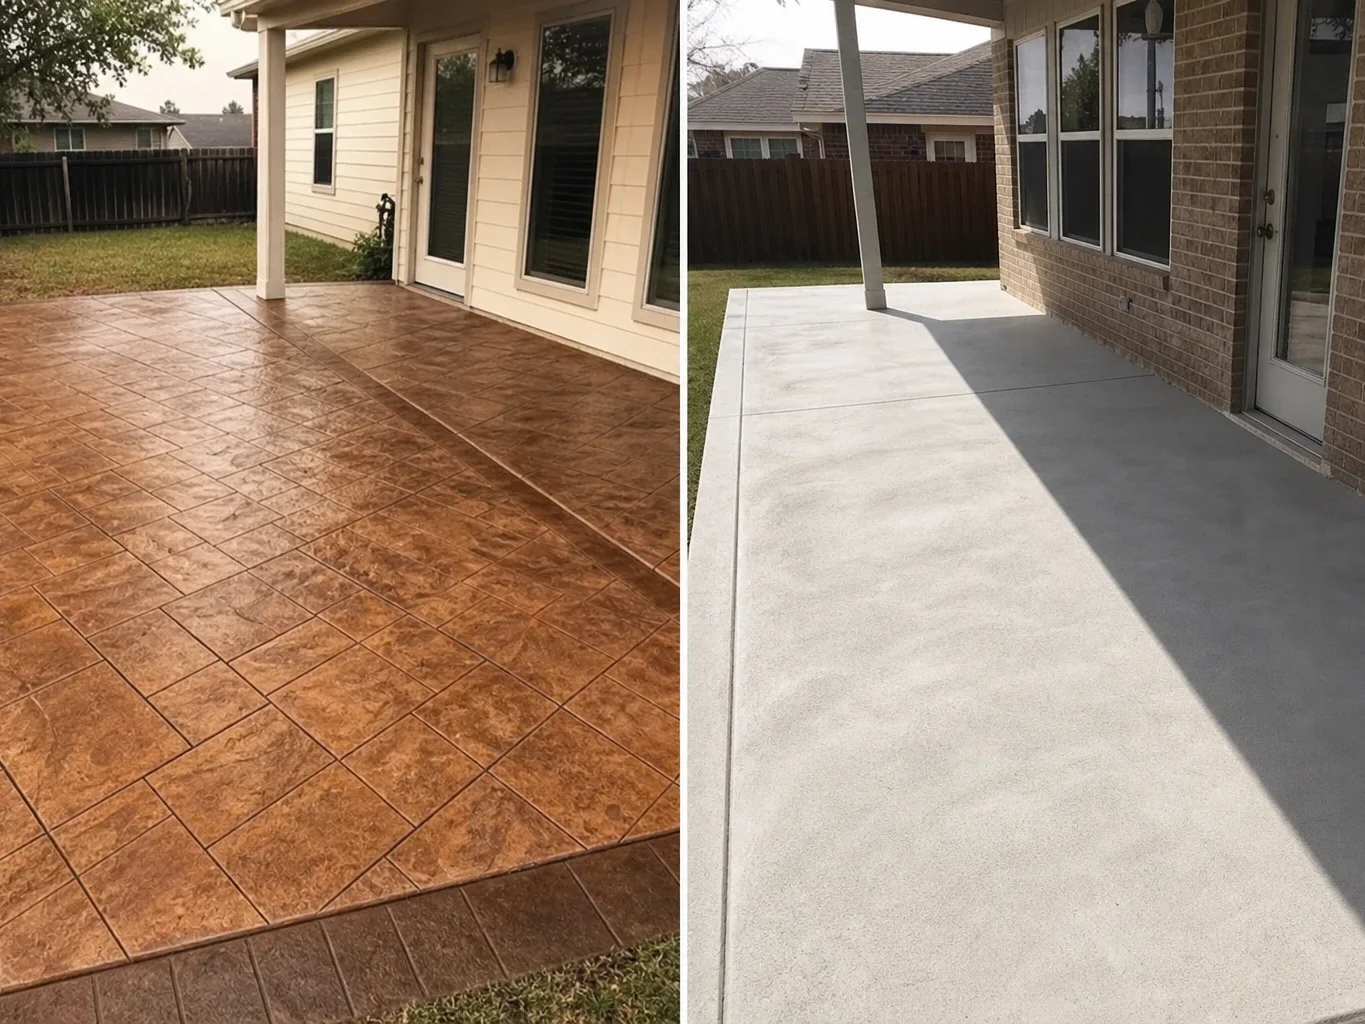
What the side-by-side patio photo shows and why it matters
The side-by-side patio photo shows two fresh slabs poured the same day: one finished as stamped and stained decorative concrete, the other left as a smooth broom‑finished slab. It highlights the tradeoff you’ll feel right away, richer look and texture versus a cleaner, simpler surface.
On the stamped and stained side, the pattern and color mimic stone or pavers while staying one continuous slab, so there are fewer places for weeds than with separate pavers. The texture adds toe‑hold underfoot; with the right pattern and a traction additive in the sealer, most crews target at least a 0.6 wet static coefficient of friction (a common safety benchmark for patios). Expect periodic resealing to keep the color and sheen even; most sealer makers suggest reapplying every 2 - 3 years outdoors, or yearly in high‑traffic zones.
On the smooth side, a light broom finish gives subtle grip without a heavy texture, so furniture slides easier and sweeping is quick. The look is minimal and uniform, and touch‑ups blend more easily if you add onto the slab later. Outdoor concrete is often sealed to help resist stains and sun wear, usually with simpler maintenance.
Curious how these finishes fit your shade, slope, and furniture plan? Describe your space and Request a quote.
Stamped vs. smooth slab: how to choose for your backyard use
Pick stamped concrete if you want design and built‑in texture for traction; choose a smooth slab if you want a sleek, modern look that sweeps and hoses off fast. Most backyards use a mix: stamped where people gather and move, smooth where you grill, store, or roll things.
For dining zones and lounge areas, stamped patterns add character and help shoes grip when someone spills a drink. A light texture can also cut glare in bright Central Texas sun. If you want a flagstone or wood‑plank look without the upkeep, Stamped concrete options can be matched to the house style.
Around grills and prep carts, a smooth finish makes scraping grease and ash straightforward. Use a sealer suited to exterior concrete to keep cleanup simple.
For kid play spaces, lean textured. A medium stamp or a light broom finish (fine lines brushed into the surface) adds wet‑foot traction, especially near splash pads.
Plan transitions so the patio works as one surface:
- Put stamped in walkways and seating “lanes.”
- Keep smooth pads under grills and storage.
- Use a control joint (planned groove or cut) where finishes meet to help manage cracking.
Austin-area climate factors that change your patio finish choice
Central Texas sun, heat swings, sudden downpours, and our clay soils all nudge a patio finish toward certain choices: lighter colors and UV‑tough sealers, texture for wet footing, and a slab sized and jointed to ride out soil movement.
Strong UV fades dark colors faster, so many homeowners pick lighter integral color or antiquing tones that reflect heat and mask dust. For protection, a good contractor may use a UV‑resistant sealer; film‑forming sealers (a clear coat on top) can boost color pop, while many penetrating sealers (soak in, no gloss) change the look less and often breathe better. Summer heat and cool nights create thermal swings; lighter colors usually stay cooler underfoot than darker ones, while texture mainly improves traction.
Downpours demand drainage first. Patios should slope about 1/8 to 1/4 inch per foot away from the house (a common rule of thumb) and use texture or fine grit additive to target a wet static coefficient of friction of at least 0.6 (a safety guideline many installers follow). Expansive clay soils move with moisture; most backyards do well with a 4‑inch slab, and 5 inches where loads or heave are expected (typical practice here). Control joints (planned cuts that guide cracking) are usually spaced 8 - 12 feet on a 4‑inch slab, tightened for complex shapes or full afternoon sun. For color and pattern options suited to this climate, visit Decorative concrete.
Timeline and steps: from prep to sealed surface
Many Cedar Park patios take about 3 - 5 working days on site, then cure before light use at 7 days and full strength at 28 days (common concrete practice). Weather, access, and stamp complexity can add a day.
- Layout and yard prep (half to 1 day). Mark the footprint, call in utility locates if needed, and clear irrigation heads. Use practical Yard prep tips before the crew arrives.
- Excavation and base (half to 1 day). Remove sod/topsoil, grade for about 1 - 2% fall away from the house (a common drainage rule), place a compacted base as needed for the site, and set forms to the final height.
- Reinforcement (1 - 2 hours). Place rebar grid or wire mesh, supported above the base so it sits in the slab (choice depends on slab size and loads).
- Pour and finish (half to 1 day). Place a 4-inch slab for most patios, or 5 inches where heavier loads or expansive soils are expected (typical practice here). For smooth patios, trowel to the specified texture; for stamped, place color hardener or integral color, then stamp.
- Control joints and edges (same day). Cut or tool control joints (planned crack lines) about 8 - 12 feet apart on a 4-inch slab (a common rule of thumb), tighter on complex shapes.
- Curing (days 1 - 7). Keep moisture in with curing compound or wet curing. No furniture yet.
- Sealing (day 3 - 14, weather dependent). Apply a compatible sealer once the surface is dry enough per the manufacturer’s instructions. Light furniture after 7 days; full load after 28 days (common practice).
What drives the price of a stamped or smooth patio
Stamped and smooth concrete patios are priced by the work involved: how big the patio is, how thick the slab needs to be, how hard the site is to reach, and how much finish detail you choose. Stamped adds labor for patterning and coloring; smooth is faster but still driven by site prep and reinforcement needs.
Square footage scales everything: more formwork, concrete, and finishing time. Slab thickness is usually 4 inches for residential patios and 5 inches where heavier loads or expansive soils are expected (a common rule of thumb for Central Texas clays). Base prep matters: removing sod, adding road base, and compacting in thin lifts costs more than pouring on undisturbed, well‑drained ground.
Access drives labor. A backyard that needs wheelbarrows instead of motorized placement equipment or a pump slows the crew. Reinforcement choices change material and labor: wire mesh, rebar held in place, or fiber in the mix each add in different ways.
Stamped patio choices add steps: deeper or multi‑directional patterns, borders, and detailed joints take more crew hours. Staining or antique release coloring can add materials and extra labor. Sealer type changes time and materials; film‑forming sealers need careful application, while penetrating sealers are often faster to apply. Edge forms, such as rolled or decorative edges, add setup and finishing time.
Permits, HOA rules, and utility locates for Cedar Park patios
Most backyard patios in Cedar Park don’t need a standalone building permit when they’re ground-level and not attached to a new structure, but additions that affect structures or drainage can trigger reviews by the city’s permitting office. Many neighborhoods with an HOA require approval of the patio’s location, finish, or color before work starts.
Call 811 a few business days before any digging, based on the locator’s notice period. The locator marks public utility lines, such as gas, electric, telecom, and some water lines, so digging is less likely to hit one. A good contractor will also confirm private lines (sprinklers, low-voltage lighting) with you on site.
Plan for permits or extra reviews when the patio ties into other work:
- A new or expanded patio cover, pergola with footings, or attached roof usually needs a building permit.
- Pools, spas, or related equipment may involve separate permits and setback rules that can affect patio layout.
- Drainage tie-ins to curb, storm inlet, or French drains may require approval to avoid altering runoff onto neighbors.
- Electrical for lighting, fans, or an outdoor kitchen needs an electrical permit; gas lines to a grill need a plumbing permit.
Expect HOA timelines to vary; many boards meet monthly, so submit drawings, colors, and sealer sheen early. A good contractor can help assemble a clear site plan and finish samples for approvals.
Care and upkeep: cleaning, sealing, and slip resistance
Plan on gentle cleaning a few times a year and routine resealing, and you’ll keep a stamped or smooth patio looking sharp and safe under Central Texas sun and showers. Most patios also benefit from texture or a grip additive to help keep wet areas at or above a 0.6 static coefficient of friction, a common safety target for walk areas.
Rinse dust and pollen with a hose monthly in spring and fall. Use a mild degreaser where the grill sits, and a soft-bristle broom or low‑pressure washer (wide fan tip) for algae after summer downpours. Avoid harsh acids on colored or stamped work; they can lighten the finish.
Reapply sealer on outdoor patios every 2 - 3 years, and yearly on high‑traffic spots, depending on sun exposure, traffic, and the product used. A film‑forming sealer boosts color depth on stamped work; a penetrating sealer reduces darkening on smooth, modern slabs. Ask for a non‑slip additive in the sealer for shaded or frequently wet zones.
If color has faded or hairline cracks show, a thin overlay can refresh the surface; Concrete resurfacing is one option. Where the slab is sound but dull, Concrete staining can add new color.
Checklist: what your patio bid must include
A clear patio bid spells out the size, thickness, base, reinforcement, control joints, finish details, color system, sealer, drainage, cleanup, and schedule. Use this checklist to compare apples to apples and avoid surprises on pour day.
- Size and layout: total square footage, shape, and any steps or borders shown on a plan.
- Slab thickness: usually 4 in for patios, 5 in where heavier loads or expansive soils are expected (a common rule of thumb).
- Base prep: depth of excavated soil, gravel type and thickness, and compaction method and passes.
- Reinforcement: welded wire mesh, rebar layout and spacing, or fiber in the mix, plus supports to keep steel in place.
- Control joints (planned cuts that guide cracking): spacing, depth, and pattern relative to slab shape.
- Finish details: smooth trowel or stamped pattern name, texture depth, and edge forms.
- Color system: integral color in the mix, stain, or antiquing color release for stamped concrete.
- Sealer: type (surface film or penetrating), gloss level, slip‑resistant additive, and recoat plan.
- Drainage: slope direction and rate, tie‑ins to drains, and transitions to sod or deck.
- Cleanup and protection: washdown, sawcut dust control, and plant/stone protection.
- Schedule: target dates for prep, pour, stamping/troweling, joint cutting, curing, sealing, and furniture return (usually 7 days for light use, 28 for full strength per common concrete practice).
| Item | Typical Option | Alternatives |
|---|---|---|
| Reinforcement | Rebar per plan | Mesh, fibers, or combo |
| Color system | Integral color | Stain or dry shake hardener |
| Sealer | Film‑forming acrylic | Penetrating sealer |
Ready to plan your Cedar Park patio? Here’s your next step
Stamped or smooth, choose based on how you’ll use the space, the texture you like underfoot, and the upkeep you’re comfortable doing. If you want more traction and pattern choices, stamped fits; if you prefer a clean, easy-to-sweep surface, a smooth broom finish tends to win.
Share a photo of your yard, rough size, preferred finish, any drainage issues you’ve noticed (standing water or soggy spots), and HOA notes like color or edge rules. A good contractor can help refine a durable, good‑looking design that suits Cedar Park soils and sun.
If you’re ready to talk options, reach out to contact ATX Concrete Contractor. Ask about layout, joint placement, sealers, and timelines so you can make a confident patio choice.